
- Community >
- Blog Central >
- Blog by Lyra Pappin >
- 3 Cool Ways To Make Your Own Stamps
| Jan 21 |
3 Cool Ways To Make Your Own Stamps
|

Making your own stamps is easier than you think! While it might take some time to get started, creating your own stamps is not just a fun activity, but can add a nice personalized touch to gifts for friends and family. If you start with a simple stamp design, you can progress further into the realm of fancy and intricate stamping!
Stamps can be used to create your own stationary and gift wrap or as an easy way to add design to material for hand bags, linen, or anything else you can think of!
There are different ways to incorporate stamping into your craftwork, so let’s take a look at three fun and cool stamp styles.
The best way to begin creating your stamp is to get acquainted with the various stamping materials available. There are different rubber pads that can be used to carve out your stamps; there are also stamping kits that come complete with cutting tools.
A good basic stamping rubber is called “Speedy Stamp” or better known as “Pink Stuff”. It is pliable and soft enough to cut into without too much difficulty.
In addition to your stamp material, you will need:
-
carving tools (either those designed specifically for stamps, or a sharp Exacto knife)
-
a simple design image
-
tracing paper
-
a ballpoint pen
-
fine grain sand paper
-
ink
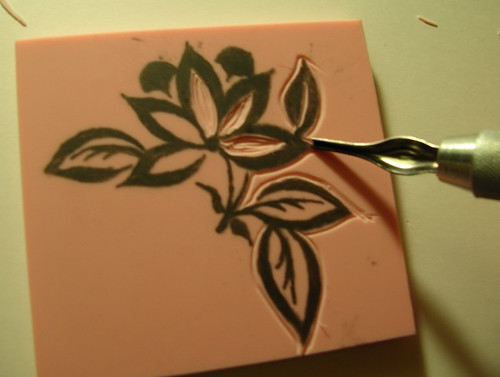
If you are new to carving stamps, be sure to select a simple design that doesn’t have too many details. Place the tracing paper over the design and copy it onto the tracing paper. Next, flip the tracing paper ink side-down onto the Speedy Stamp. You can use the back of a spoon or something hard and firm to transfer the image smoothly onto the stamp material. If you need to make any corrections, use your ballpoint pen.
Begin carving the rubber pad away from your design. It is very important to cut outward from the design, so you don’t accidentally slice through it. Also remember to start with the simplest part of the design, don’t worry about the details until the end. If you have different carving tools, use the thickest one to clear out the space around your design to avoid any large ink pools when you go to use your stamp. Some stamping material has a glazing material over top of it, so you may need to sand your stamp gently before using it.
Be sure to generously ink your stamp and begin testing it out! If you need to make any modifications, remember that you can always take something away, but you can never add it back! Work slow and steady and you should have great results.
A really fun and easy approach to stamping is to make simple designs out of leftover corks from wine bottles. While these cork stamps don’t have the same potential for intricacy as rubber stamps, they are cute and decorative additions to gift wrap and fabrics.
You will need:
-
corks
-
silver Sharpie marker
-
ink or paint
-
Exacto knife or carving tools
-
pencil with rubber eraser
Begin by simply drawing a basic shape on the top of a cork with your silver Sharpie. Next, again remember to cut away from your design using your craft knife. If you make a mistake, you can simply cut the top of the cork off and start over.
When you are satisfied with the shape, dip it into some ink or paint and test it out! The rubber eraser at the end of a pencil is great to use for polka dots, or as the center of a bow, if you choose that kind of design. Other great shapes are: moons, stars, clouds, lightning bolts, or flowers – anything basic without too many details.
Depending on the material you are decorating, you can use different kinds of paint, whether acrylic, fabric, or anything else that you find works for you!
A great spin on the stamping idea is to use the bottoms of rubber shoes as your stamp!
The tread marks from shoes make for interesting designs that you can apply to t-shirt, hand bags, make up cases, and more. You need a larger area to make this worthwhile, so it won’t work as well for gift wrap or stationary.
You will need:
-
old shoes with clean soles
-
paint
-
roller or foam paint brush
-
material (t-shirt, cloth, towels, etc.)
-
scissors
-
thick paper
First, create a stencil using thick paper like card stock. Once again, basic shapes are ideal for stencils. Place the stencil on the material and make sure to hold it in place. Use a roller or a foam paint brush to coat the shoe soles before placing it over the stencil. Hint: It is easier to press the shoe firmly onto the material if your hand is inside it!
Repeat your design with different shoe treads for different designs until you are satisfied with the print. Just make sure to clean your shoes before the paint dries onto them!
For more crafty stamping ideas, check out the Craft Chi blog.
Footnotes:
Sources:
http://zenheart.livejournal.com/26395.html
http://craftchi.com/blog/?p=323
http://craftchi.com/blog/?p=422
Photo Credits:
http://static.flickr.com/24/92865116_54a3aecb2a.jpg
http://craftchi.com/blog/wp-content/uploads/2007/05/146_4644.jpg
http://craftchi.com/blog/wp-content/uploads/2007/07/152_5252.jpg
- Category:
- All Things Crafts
- Tags:
- making gifts
- making stamps
- stamps
- crafts


