- Community >
- Blog Central >
- Blog by Johanne >
- How to Make a Mosaic Pumpkin for...
| Sep 26 |
How to Make a Mosaic Pumpkin for Halloween
|

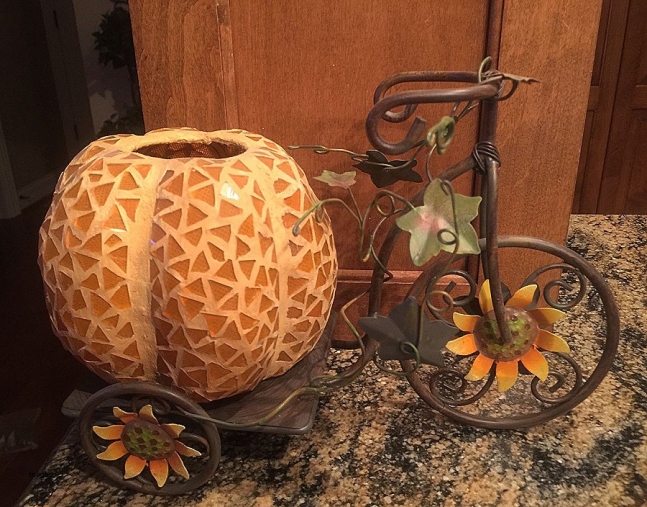
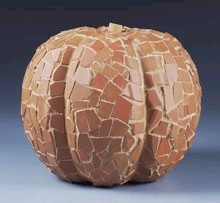
The fall season is beautifully here and with Halloween just around the corner, I thought I'd share this wonderful craft project idea to make a mosaic pumpkin.
I came across this project on All Free Crafts and I really like it because it's fun and festive for Halloween but also great for many other occasions. The pumpkin shape is made of foam and covered in tiles; of course you can create your own festive shape for the holidays, Valentine's Day, or create something elegant for everyday decor.
I'd personally love to create this pumpkin in white for a beautiful glossy gourd! Enjoy!
Instructions from Kathleen George at All Free Crafts.
Make the mosaic tile pumpkin:
MATERIALS NEEDED:
Firm foam ball, 8" (like STYROFOAM):
Other Materials:
Chipped & cracked terra cotta pots and saucers
Latex adhesive for ceramic floor tile
Sanded grout for floor tile
Wooden dowel, 1" x 3"
Burnt umber or black acrylic paint (optional)
Serrated knife
Candle stub or paraffin
Fine-line black permanent marker
Pencil and Ruler
Large rubber bands, three
Metal tablespoon
Measuring cup
Disposable bowl
Rubber spatula
Rubber gloves
Bucket
Sponge
Palette knife
Linens: old towel; clean, soft rag
Hammer
Tile nipper (optional)
INSTRUCTIONS:
1. Wax serrated knife with candle stub or paraffin. Cut thin slice from bottom of foam ball. Mark center bottom and center top of ball. Use marker to divide ball into six equal vertical segments. To make this easier, wrap three large rubber bands around ball before marking.
2. Use a knife to cut 1/2"- to 1"-deep V-shaped groove along each segment line. Smooth cut edges with a backside of a metal spoon. Carve a small hole in the center top for stem; insert a dowel to check fit and set aside.
3. To prepare mosaic pieces, place terracotta items, one at a time, inside an old towel. Use a hammer to break items into 1" to 1-1/2" pieces; do not pulverize. Remove smaller pieces periodically to check size. Continue until you have approximately 6 c. of mosaic pieces.
4. Use a palette knife to spread 1/8"-thick layer of tile adhesive onto a small section of foam pumpkin. Press terra cotta pieces firmly into adhesive, leaving a roughly equal amount of space between pieces. Use curved terra cotta pieces on more rounded parts of the pumpkin where possible; do not cover stem hole. Repeat to cover pumpkin; let dry. Glue stem into the hole.
5. Follow manufacturer's instructions to mix grout, unless using pre-mixed grout. If desired, tint grout with a small amount of acrylic paint in a disposable bowl; mix well.
6. Wearing gloves, spread grout onto the pumpkin, working it into spaces between terra cotta pieces. Use a spatula to scrape off excess and to reapply where needed.
7. Use soft, damp sponge to clean mosaic surface after grouting. Rinse tools and sponge in a bucket of water rather than household sink; discard water outdoors.
8. Use a soft rag to clean face of terra cotta one last time; set aside to dry completely.
Subscribe to our newsletter to do not miss any new blogposts!
Follow us on Instagram, Facebook, Pinterest
Project instructions and image courtesy of All Free Crafts.
Main Photo Credit: layretreats.com
- Category:
- Holidays & Occasions
- Decorating Ideas
- Tags:
- Halloween
- pumpkin
- mosaic tiles
- decorating
- craft ideas
- DIY
2 Comments
Nov 15, 2010 | Johanne
-J