In the previous tutorial, we choose the best product photo to use in your banner and a font for your company name. Now we can begin to build our banner.

1. Open Photoshop. Click File – New to start a new image. Our banner needs to be 625 pixels. In the dialog box set the Width to 625 pixels, the Height to 100 pixels and the Resolution to 72.
2. You will also want to open your product photo into Photoshop.
Our first decision is the color of the background for the banner. Because the background in the product photo is a cream colored fabric, I decided to use this cream color in the banner. We can use the Eyedropper tool to grab the cream color from the product photo.
3. Click on the Foreground Color box (small white square) at the bottom of the Tools panel (left side of workspace). This will open the Color Picker. Move your mouse over the product photo and click on the background. Then click OK to close the Color Picker. You will see the small white square change to a cream color.
4. Now, click on the Paint Bucket tool (looks like a bucket) and click inside the banner. This will fill the banner with the cream color.
Our next concern is the balance of our design. The placement of your two major design elements will have a great affect on the overall balance of the design. The easiest way to create balance in a two-element design is to place one element on each side of the design.
5. Let's copy and paste the product image into the banner and place it on the right side of the design. Click on the top bar of the product photo. From the Menubar, click Select – All. This will place a selection around the photo. Now, click Edit – Copy.
6. Go back to your banner image and click Edit – Paste to add the photo to the banner.
Your photo will probably be too large for the banner at this point. We need to reduce the photo until the product shows nicely within the banner.
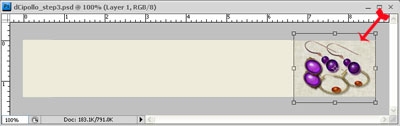
7. From the Menubar, click Edit – Free Transform. Hold down the Shift key on your keyboard. This will insure that the photo will not be distorted as we reduce the size. You should see a box around the edge of the photo. This box has eight small squares or handles. Click and drag inward on one of the corner handles to reduce the size of the photo. Continue reducing the photo until the product is visible in the banner.
When you have the photo adjusted to size, click the Commit button (black checkmark) on the Options Bar (top of workspace).
8. Now that we have the product in the banner, use the Move tool (first tool in the Tools panel) to click and drag the product to the right corner.
In the next tutorial, we will add your company name.
You can download a free trial version of Adobe Photoshop from the Adobe website.
Adobe product screen shot(s) reprinted with permission from Adobe Systems Incorporated. Adobe Photoshop is a registered trademark of Adobe Systems Incorporated in the United States and/or other countries.
- Category:
- Selling Online
- Tags:
- your iCraft store
- banner
- digital art
- DIY banner
- for newbies
- using Photoshop