 Now that we have customized the iCraft widget with your store’s name and products, let’s examine the other options you have for customizing the widget. For this tutorial, we will create a widget that will fit into the narrow sidebar of a blog. This is a very common place for advertising widgets. Because these sidebars are usually narrow in width, we will need to make some more changes to the parameter settings for our widget.
Columns and Rows
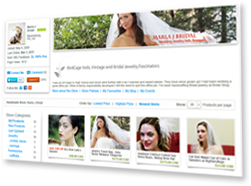
These parameters will control the number and placement of your product thumbnail images. The Columns parameter tells the widget how many images to place horizontally. Let’s change this to”1” because we need our widget to fit into the narrow sidebar of a blog.
The Rows parameter will set the number of images placed vertically. We could put a large number here, such as 5. However, we don’t want the widget to be that tall. Let’s set the Rows parameter to “3”. These settings will give us a widget with three product thumbnails stacked vertically.
However, you will notice that we get a scrollbar on the right side of our widget when we set the Rows parameter to 3. This is because the widget’s box is set by default to 380 pixels wide and 389 pixels high. The three product thumbnails cannot fit within the 389 pixels. Let’s increase the Height parameter of the widget to “550” and the scrollbar will disappear.
Now we have the height adjusted for our widget, we need to work on the Width. As you can see, the widget box is still too wide for our blog sidebar. Let’s set the Width to 200 pixels. Because the thumbnails for our products are only 165 pixels wide, this will give us a nice thin border around the thumbnails.
View Mode and Image Size
The View Mode gives us several options for what information is included with the thumbnails. We can add the product’s price, the title of the product or both. Adding this information will increase the physical size of our widget. Therefore, if you choose to include the price or title, you will need to increase the Height of the widget accordingly.
We also have several options for the Image Size of the thumbnails. As we mentioned above, we are using the Small sized thumbnails (165 x 140 px). Because we need a narrow widget, this is the best size for our needs. However for other widgets, we could use the Tiny size (100 x 85 px), Medium size (192 x 155 px) or Large size (415 x 385 px). Again, you will need to adjust the Height and Width settings to avoid those scrollbars.
Border Width, Border and Background Color
There are a few parameters that control the look of the widget. Experiment by changing the colors of the background and border to see what colors enhance the display of your products.
Once you have customized all the parameter settings, click the Preview Widget button one last time and copy the HTML code for your widget. This code can be placed in any webpage or blog that supports Flash. Use the My Stuff application to place your widget on your Facebook page.
- Category:
- Selling Online
- Tags:
- your iCraft Exhibit
- your iCraft widget
3 Comments
Apr 24, 2018 | 9 Mile Crafts
Apr 24, 2018 | iCraft Admin
This widget can embedded on your own blog post or a website, where you have control over the page.
Apr 23, 2018 | 9 Mile Crafts